Wednesday, October 30, 2013

DIVA CHALLENGE #142 -or- THE DANGER ZONE!!

OK - this week's Diva Challenge #142 was to step outside of our comfort zones & into the DANGER ZONE.

I thought long & hard about the kinds of things I avoid, or don't like doing.  I made a list:
* I never really use organic, non-repetitive/tight patterned tangles
* I don't like to use only b&w/gray scale
* I have a hard time using strings
* I generally like to work with paper or board cut in perfect squares
* I find it difficult to throw symmetry out the window.
* I always sketch, sketch & re-sketch new tangles I'm learning before I ever put them down on paper
* I can always find a use for a ruler, compass & protractor - which is a Zentangle No-No.

I could go on further, but instead I'll just show you what I came up with.


tangles used: fern, zinger, decostar (modified into flower)
This first one is much looser & organic than anything I think I've done before.  I did this in gray-scale. Both fern & zinger are tangles I've never used.  I also have a tendency to not tangle with flowers at all (don't get me wrong, I can draw flowers for days - it's my favorite subject in any medium or style... but for some reason I just don't tangle with them.) 

next up:

tangles used: kandy ribnz, clothesline, fescu, por-fin, yew-dee, frillee, drack, asian fans, thumbprintz

First off - the paper.  This is a marbling that I did a few months back when experimenting with Mr. Sketch Scented Water Color Markers.  I know you all remember these things from when you were little.  I saw them in the store one day & snatched them up out of pure nostalgia.  Second, it's all done with black micron's.  Third (& most importantly,) each of these tangles are ones I've never even attempted before (excluding clothesline).  I didn't try them out in my sketch book on grids, I didn't use a pencil, ruler, compass, etc. to lay them out, & I started with a freehand string that I outlined in thick black lines to accentuate the use of the strings.  I really jumped in head first, & you know what, I really enjoyed doing this.  PLUS, it didn't turn out half bad!

I'd love to hear any comments, suggestions, criticisms... or anything else any of you'd like to say.

Have a happy, safe, & spooky Halloween!  I'll see you all once I'm done stuffing all the goblins back in the closet!

Zendala Dare # 78

HAPPY MISCHIEF NIGHT / DEVILS NIGHT / NIGHT BEFORE HALLOWEEN!

Yep... tomorrow is the most awesome day of the year...

SO - this week's Zendala Dare #78 from The Bright Owl was a bit of a doozy for me.  All I could do for 2 whole days was look at it & think spider web, spider web, spider web..., my mind was firmly stuck in that box.  Eventually I came up with something, & even used one of the new tangles on TanglePatterns.com (bumpkins.)

I do need a bit of help here.  Look at my zendala.  Top right hand 1/4, to the right of paradox... someone, PLEASE tell me what this tangle is called.  I can't find it anywhere... & it's a pattern I've been using since before I ever knew what Zentangle was... but it has to have a name, right?  Help a gal out!

tangles used: bumpkins, hypnotic, paradox, persian cat & ???
Also - I want to thank all of those who have commented before, & all of those who will comment in the future.  You all seem like really gosh darn swell folks!

Friday, October 25, 2013

ZENDALA DARE #77 No. 2 + MURPHY'S LAW


You all know how these sort of days go... if it can go wrong, it WILL go wrong.

Well, I've been having a whole week like that - at least as far as The Bright Owl's Zendala Dare #77 is concerned.  See, I love this template.  Love it.  LOVE IT LOVE IT LOVE IT.  My first go took like 25 minutes & was just something for fun, but my jittery hands kept me from doing anything even close to serious with it.

I recently found a flickr page full of tangles by Neil Burley.  Holy rollin moly, how good is he?!?!  I have a deep, ingrained love for the Craftsman, Art Nouveau, Art Deco & Organic Modernism movements, & he has created quite a few tangles that just seem to sing to me.  I found his Deco Star pattern first, & I knew that I was going to use it for dare #77.  Then everything just went wrong wrong wrong & I made things terribly over difficult trying to get perfection.

Art Deco isn't forgiving.  The straight lines are perfectly straight, the curves & circles have perfect proportions & the angles are razor sharp.  I drew this over & over & over & over again trying to get that perfection; resorted to using rulers (!) & a compass (!!) & a drafting circle template (!!!) & a 30-60-90 drafting triangle (!!!!)  & I STILL COULDN'T GET IT RIGHT! 

I'm telling you... Murphy's Law...

SO, I eventually had to just make myself finish.  & I have 5 copies exact same thing.  I left one b&w, then colored the rest in a sort of theme-like way.

DECOdala - tangles used: DECOSTAR, co2 

DECOdala -New York 


DECOdala - Hollywood


DECOdala - South West
DECOdala - Miami


 I've studied Art Deco quite a bit, & it's always stood out to me how different the colors used by different regions in the country were.  These are the color schemes that I seem to associate with each of these areas.  The most classical stuff always came from NY, Hollywood Deco to me doesn't seem to use as much gold as silver, & the more modern blue/blue-green/green's are prevalent.  The South West imbued their Deco with the colors of the desert, & the great, cutting-edge hot spot of the deco movement, Miami, was splashed with bright pastels & neon lights.

I had far more fun coloring these than I did drawing them. 


Monday, October 21, 2013

DIVA CHALLENGE #141

This week's Diva Challenge #141 is DuoTangle - Fengle/Quandry 

Here's what I came up with:
tangles used: fengle, quandry
I can't help it, I'm having a serious love affair with my pastel pencils at the moment... even though I always seem to end up with some sort of smudge problem. 

In other news, did you know that if you tweet "beetlejuice beetlejuice beetlejuice," he'll tweet you back?  IT'S SHOWTIME!!!


ZENDALA DARE #77

Ever had a morning when your hands were just... shakey?  Perhaps it's just too much caffeine.  Actually, that's probably exactly what it is.

My first go at The Bright Owl's Zendala Dare #77 with the "Random Act of Zentangle" added challenge, I must admit, was completely, 100% for my own enjoyment.  I love Halloween, & anything that has anything to do with spooky fun.  On top of that, I'm of the opinion that Tim Burton can do no wrong.  I've been wanting to use the tangle BTL JOOS for something halloween-ie, & the template for this dare just screamed SAND WORMS! at me.  (Also, beetlejuice, Beetlejuice, BEETLEJUICE!!!)

So here it is, Zendala Dare #77 No.1
tangles used: BTL JOOS, bitten, hypnotic
Like I said, shakey hands this morning.  I think I did an ok job hiding it with the tangles I chose.  I think I'm going to leave this in the Party City store by my house inside one of the sand worm costumes that I saw this weekend.  I figure, if you're awesome enough to want to be a sand worm for halloween, then you must be a pretty rad person who deserves my beetlejuice Zendala.

This was tons of fun for me, but I can't say that it's all that serious.  I'm certainly going to be taking a second go at this template once my hands calm down & I can draw a straight line. 

ALSO, I'd like to share with you the following:
nice spider
A very nice (albeit slightly misguided in terms of placement) spider has been kind enough to help me decorate my front door for halloween.  I've been very careful not to mess up his work over the past few days - but it's hard.  I have a storm door in front of the main door that he keeps connecting to, & every time I open my door, it tears the web. 

Yes, I am very, VERY stoked on halloween!  BOO!

Friday, October 18, 2013

DIVA CHALLENGE #140 No. 2

You wouldn't believe how irritated I've been since I realized that I didn't do my first Diva Challenge correctly.  Somehow I just missed the word "monotangle." 

I spent a good deal of time yesterday trying to draw perfect Fibonacci Spirals.  Then watched this very cool video about them (if your interested, I highly suggest you check it out, I'll post the video at the end of this entry.)

Then... I had a magical dream last night about spiral-y things, pointillism and pastel pencils (& luckily this morning work has been slow slow slooowww); SO, in less than an hour I came up with this:
Diva Challenge #140
It's not perfect (it's certainly not a Fibonacci,) but the colors are what make it so darn fun.  The white parts were done with a white woodless graphite pencil, & all the rest is done with CarbOthello Pastel Pencils.  Pastels are so great for pointillism.  Overlaying the dots sort of smudge the colors very slightly together.  Also, how great do they look on black Canson board?  (Am I right, or am I right?)  Click on the picture to see it larger... just to look at all the little dots & layers. 

I really love color.

Now that I actually have completed the challenge correctly, I can be satisfied.  Not perfect or particularly good, but hey - I took a stab at it, & trying is the only way to learn!

Now... if you wanna see that video, here it is


Doodling in Math Class: Spirals, Fibonacci, and Being a Plant


Happy Friday Everyone!

Wednesday, October 16, 2013

DIVA CHALLENGE #140

Today I took a stab at The Diva's Weekly Challenge #140 .  (It's my first Diva Challenge!!!)  The challenge was to tangle using pointillism; which I must admit, I was super stoked about.  Pointillism is probably one of my very favorite techniques, as well as one that I haven't used in quite a while.

SOOOOOO, without further ado, here it is!
Diva Challenge #140

If you open the image to see it larger, it shows up HUGE.  The down side is that you can see my cheating.  I say cheating, because there is no way I could have drawn this using dots without guide-lines.  However; the up side of seeing it huge, is that you can more clearly see the range of different colors I used in each section to obtain shading effects.  I am very, very, VERY happy with how bitten turned out, & almost as happy with huggins.

As always, it would be awesome to hear any feedback - good, bad, indifferent.

Thursday, October 10, 2013

Cattleya Orchid in Oil Pastel

Work today has been kinda slow, & I've had a lot of time to try to work on recreating the study I did roughly a month ago of a yellow cattleya.
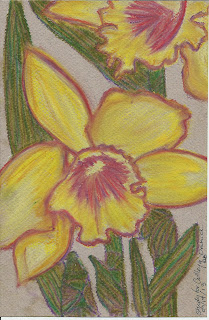
Cattleya Study

Oil Pastels are a fairly new medium to me, & I've tried just about every method/process I could find from a Google search about how to use them.  Then came the realization that I just needed to keep working with them until I found my own way.  Now I'm at the point where I think I've found my own groove, & wanted to document at least parts of the process I went through... mostly so that I'll have a reference of what's worked & the appearance of each step.  SO, here's a few steps I took.
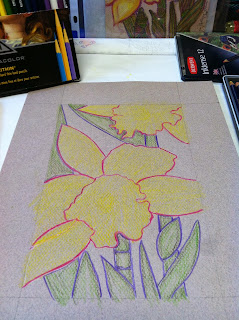
outline & underpainting prep  
1.   I always choose the size first.  The paper is a sheet of 9x12 Canson Mi Teints.  The picture size is 6x9.  The margins were marked, then the outline (what you see in purple & magenta,) was drawn using Prismacolor Verithin hard lead pencils.  After that, a light layer of base colors were added to the blossoms & foliage using Derwent Inktense ink pencils.  (If you haven't used these, they are an awesome medium - use like watercolor pencils, but the color is more vibrant, & once dry after washed over with a wet brush, the color is permanent, & won't migrate/bleed.)
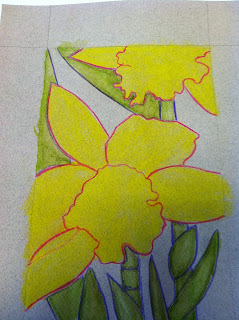
Derwent Inktense Wash
(*NOTE* - if using non-watercolor paper like I did, make sure you work fast & with as little water on the brush as you can so that the paper doesn't warp & become wrinkled.)
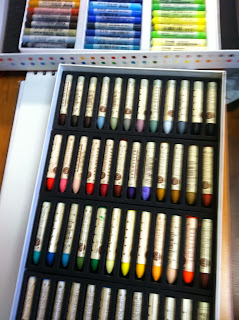
(back) Hard OP's by Erengi, (front) THE KING of OP's, Soft OP's by Sennelier

2.   When the wash is completely dry, it's time to start applying the pastels.  I've found out that the way I work best is to use a harder OP for the first layer or two.  My favorite of the harder pastels are Erengi ArtAspirer's.  A hard OP will often create a LOT of crumbs; (it's often difficult for me to remember not to try to brush them off with my hand) I remove the large crumbs with a dry, stiff brush, then use my favorite pastel tool - a Color Shaper - to do an initial blending. 

When I'm ready to move on to the softer OP's, I use the Color Shaper to make sure all the tooth is filled in & the surfaces covered are smooth.  This is a personal preference.
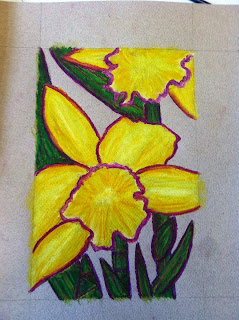
first layer - blended & finished
3.   Now it's time to move on to the softer, smoother, beautifully creamy soft OP's.  My favorites, & the ones I used in this picture are Sennelier.  Detail, detail, detail... tiny amount of blending... a little more detail & color... remove crumbs.. & VOILA!
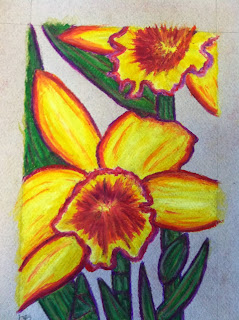
finished!!! 
I'm pretty certain I've overworked this...

My main problem with creating any sort of work in general is knowing when it is finished.  Sometimes I go too far, other times I don't go far enough.  HOWEVER, I do love the brightness of this, & the colors I used.  So I'm satisfied - & that's huge.

Tuesday, October 8, 2013

ZENDALA DARE # 76 - No.2

I have a really hard time drawing in black & white.  Not because I find it difficult, but because I just LOVE COLOR SO SO SO SO MUCH!  That being said, b&w can be much more striking than color in many cases.  I'm just not so sure this is one of them...

This go 'round was tedious.  & don't you hate it when you are almost done with something & you mess up!  Take a look, it's not hard, the boo-boo's just jump right out at you. 

Anyhow, I wanted to do a zendala in just grayscale... so that's what I did... & here it is.
tangles used: bilt, hibred, bandola, dl sunray, pomegranate

Thanks to the wonders of technology (specifically a high resolution scan,) I plan on taking a short-cut & printing out a version of this with no shading so I can go back & color it.  I figure I'll update this when I'm done with some vibrant versions of this zendala.

Monday, October 7, 2013

ZENDALA DARE # 76 - & possibly a new tangle???

I love the new zendala dare template #76 from The Bright Owl .  It somehow fit in perfectly with 2 things I've been contemplating these past few days: color wheels & what I think might be a new tangle made by meeeeee!  Think is the operative term, I don't want to be stepping on anyone's toes in case there is a tangle out there somewhere just like this that I have been unable to find.  (sooooo, if this looks familiar to you, let me know!)

Without further ado, here's my (what I'm sure will be first-go) Zendala Dare #76
colorwheelKLB
I'm calling this colorwheelKLB - because I basically just used my initials to tangle this.

The tangle I think I may have created I'm going to tentatively call "k'sK's"
k'sK's
Incidentally, the B's I used in Zendala Dare #76 have the same proportions & can be laid out in exactly the same way as the K's.

I'd like to re-do this a bit brighter.  I bought a brand new box of Prismacolor Verithin pencils this weekend, & wanted to use them.  I know I could have done a bit better on the coloring, but I wanted the colors to blend into each other, & the lighter you use these hard pencils, the better the color layers.

If anyone is wondering where the L's are, the outside diamond parts uncolored with black dots in them are my L's.

Please let me know what you think! 

ZENDALA DARE #75 - TAKE 2

tangles used: whisket
I just love my pastels so much.  Combining them with tangles just seems so natural.

Now on to the bright owl's Zendala Dare #76!

ALSO - here's the beginning of the lady slipper orchid... I'm thinking it was a mistake to do it on white paper, & should choose another color & start over... it's just... what color?

If you see this & have any ideas, leave me a comment, I'd greatly appreciate it!
green & white lady slipper orchid test - pastel on cold press wc paper

Wednesday, October 2, 2013

I'd surround myself with real ones if it were practical...

so many flowers!

I've been trying to do several things at once... & thankfully, some of the results have been acceptable, (though, not all of them.)  Teaching myself how to use oil pastels AND draw orchids.  I probably should have started with one, then gone to the next... HOWEVER, I personally like to just go ahead & jump in with both feet. 
1st go with oil pastels - Sunflower
ok, so I didn't just jump right on to orchids.  & also, I didn't do my first orchid in oil pastel - I did it in traditional pastel.
1st orchid - bright green phalaenopsis - pastel on mi teints
here's the first combination of oil pastels & orchids - & I really love this for some reason
light green phalaenopsis - ink, oil pastel on mi teints
I am kinda irritated that I had drawn all my lines in ink... I don't know what I was thinking!

Next - a study done completely in op's that I want to recreate almost exactly the same, except with a little more definition & a little less scribbleyness.
yellow cattleya (study) - oil pastel on mi teints

AND FINALLY, a flower portrait I can be completely proud of because I love it to pieces.
purple dendrobium - oil pastel on cold press wc paper
I think that when I started using oil pastels I tried to just blend blend blend all of the lines & colors.  Now I realize that I'm pretty sure I like the way they look when I use much, much less blending, & just let the vibrancy of the individual colors & lines stand out.

Next up - I'm working on a close-up of a single lady slipper orchid.  I'm just in the sketching stage right now, & I've got a new tin of CarbOthello pastel pencils that are so incredible to work with, so I'm fairly certain that is the way I'll go.  

If only I could stop doodling, which turns into tangling, & next thing I know, hours have passed & all I've done is fill sketch book pages with tangles - leaving no time for me to do other work!  I don't mean this in a bad way, but tangling & learning & searching for new tangles is such a time suck!!!  ALSO - have you ever played Tetris for a long period of time, & when you go to bed, you dream TETRIS??!!??  WELL - when I tangle for a long time, I dream tangles.

Perhaps I should just do some orchid tangles?